Add controls and define rack layouts
New Turbidimetric assay (USP <81>/JP 4.02) documents have a standard with a 5-step concentration sequence and a single test sample. You can add controls and extra test samples. To assist you in keeping track of the spatial arrangement of your samples, you can also create a visual representation of your rack layouts.
Before you begin
About this task
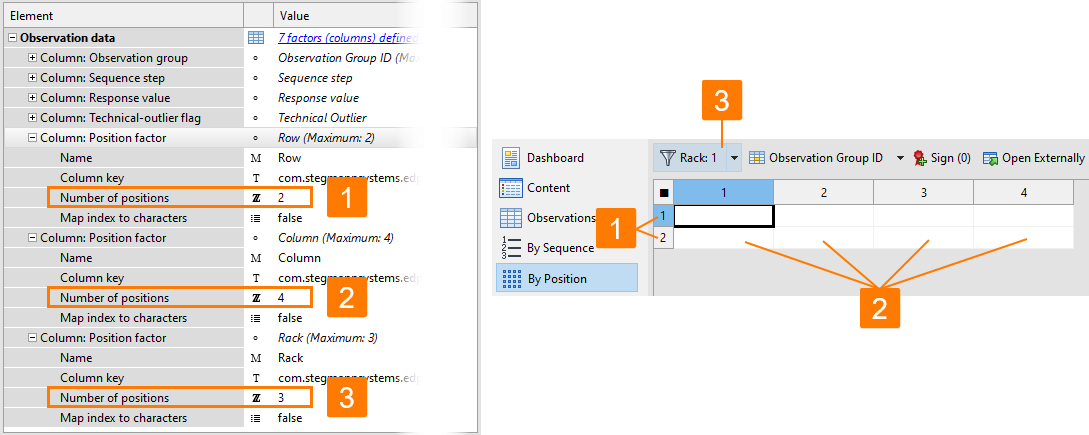
By default, Turbidimetric assay (USP <81>/JP 4.02) documents have 2 assay elements, that is, the 5-step standard and a test sample, with 3 replicates each. You can view the default setup in the By Position editor. The data table has 2 rows and 4 columns, which represents a tube rack with 8 positions. It accommodates the 5-step standard, 1 test sample, and 2 control tubes.

To set up the data table in the By Position editor, you work with the Column: Position factor elements in the Observation data section of the Content editor. Three position factors are available by default. One factor for the rows, one for the columns, and one for the racks.
The value of the Number of positions element available for each factor lets you define the data table in the By Position editor.

Both USP <81> and JP 4.02 recommend to use controls with the turbidimetric method.
-
To comply with USP <81> you can add a control with 6 replicates, which lets you set up 2 control tubes of the test diluent without antibiotic for each of the 3 tube racks.
-
To comply with JP 4.02, you can add a control with 3 replicates, which lets you set up 1 control tube of water plus suspension of test organism for each of the 3 tube racks.
In this example, you set up the assay document to comply with USP <81>.
Procedure
- In the Content editor, go to .
-
Use the Creatable elements pane to add a
Control element.
Results: PLA 3.0 adds a control named CTL 1 to the Assay elements section.
- For the new element, change the Number of replicates from 3 (default) to 6.
- In the By Position editor, make sure that the position filter (first drop-down list) is set to Rack: 1 and the primary display factor (second drop-down list) is set to Observation group ID.
-
Assign assay elements to positions according to the following logic:

Figure 2. Assignment of assay elements to rack 1 positions in the By Position editor Tip:To improve the readability of your table, you can activate the grid color view option. This example uses the By sequence step grid coloring. -
Select Sequence step as the primary display factor and
assign each of the 5 concentrations to 1 table cell of the standard, matching
the rack layout of your experiment:

Figure 3. Assignment of concentrations of the reference standard to rack 1 positions in the By Position editor - Select Rack: 2 as the position filter and repeat the assignment of observation group IDs and sequence steps according to the setup of your experiment.
- Select Rack: 3 as the position filter and repeat the assignment of observation group IDs and sequence steps according to the setup of your experiment.
- Save the document.
